(Update: 7 April, 2021: Addition of TrueNAS name and VNC tip from Gianpietro below.)
Background:
I’ve been using FreeNAS for a couple of years now as my main go-to file server at home and am super happy with it. As my install is getting old now, before diving straight in and updating my ageing 9.10 setup to the latest 11.2 I dragged out my old N40L Microserver to give the latest version a whirl, mainly to try out the VM hosting that now seems to be (almost!) now properly baked into FreeNAS without any unofficial tinkering. In short, it’s great. It’s pretty simple once you know what you’re doing too so I thought I’d give it a spin.
Scenario:
After installing the lightweight Raspberry Pi Desktop (yes, they do an x86 one!) the newly installed OS did its updates, rebooted, brought me back to the desktop and all was well. Until …
Problem 1:
When (re)booting the VM, the graphics in the VNC window were all scrambled. As Giancarlo mentions below, altering the VNC settings (in the VM Device options) to use a display of 800×600 fixes this issue.
Problem 2:
My VM will not boot!
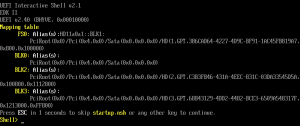
After gracefully shutting down the VM and then starting it up again later on that day, my machine would not boot. Rather, the VM would start but the operating system would not boot past a UEFI Interactive Shell.
Reason:
After a bit of digging it seems this is a well known problem where the finger is being pointed towards jointly between the GRUB boot manager not saving files where Bhyve expects and Bhyve not looking for bootfiles in the location saved in by GRUB.
Solution:
The trick here is to manually boot the machine by pointing it to the EFI boot file, then to place a copy of the boot file into the place expected by Bhyve.
- At the UEFI Interactive Shell, simply type exit

- At the Bhyve boot screen, select Boot Maintenance Manager

then Boot From File
- You should now see the details of the first virtual disk to boot from.
Press Enter to select the disk - Press Enter to select the single EFI option

- At this point you should see an OS name, mine here being Debian.

Use the cursors and Enter key to select this. - Finally, select the file visible: grubx64.efi

- Your VM will now boot up to your selected OS.
- Your OS has now booted but at this point in time if you were to shutdown and start up the machine again you would be faced with the same at next boot. To fix this from within the OS you now need to open a root shell. For the uninitiated, you can do this in most modern OSs by opening a standard shell and running sudo su .

- Now, navigate to the EFI directory of your operating system. Do this is by typing cd /boot/efi/ followed by the directory as seen in the previous steps.
In my case: cd /boot/efi/EFI/debian/
To confirm you are in the right place, type ls and you should see a line reading grubx64.efi.
This file contains the boot instructions that the machine is looking for on bootup. It’s just not in the correct location as yet. - Next, make a copy of the boot file to the correct location: /boot/efi/EFI/BOOT/bootx64.efi
You can do this by doing: mkdir /boot/efi/EFI/BOOT/
Then: cp grubx64.efi /boot/efi/EFI/BOOT/bootx64.efi
- You can now close your shell prompt.
Type exit
Then again exit
This should be all that’s required to get your machine booting without any extra manual interaction. Just be aware though that if the grubx64.efi file ever changes (maybe after an OS update), a new copy will have to be made over the bootx64.efi file again.
Now, there is a lot of stuff that goes on in the background to do with VMs and booting that I’m not going to pretend I know everything/anything about but if you’re interested in the detail, KrisBee in the FreeNAS forums explains it all here.
Thanks, I gave up on this issue a while back. Many of the threads I found described this solution but were not clear on it’s execution. Came back to it and found your page. Problem resolved!
In the middle of a whole bunch of self-inflicted problems, this one hit. Your post saved me some grief. Thank you!
Thanks for the great tip. This saves me from having to VNC in to the VM just to get it booted.
Thanks for the tip. Worked like a charm! I may also add that before using I had to force the VNC resolution (under device) to 800×600 to have a working VNC screen.
Thanks Gianpietro!
Next time I get round to doing this again, If I have the same issue I’ll be sure to add it to the guide above.
I tried this but it does not work for me 🙁
i’m able to boot of the file but after i did the changes it still stuck in UEFI Shell 🙁
My issue is that there are no files listed to be able to boot from file.
I have an issue that seems comparible, but i never get to install in the first place.
When i add the ISO it never boots, it always goes straight to the EFI shell.
And from there im stuck, i do not see the disks either. (tried AHCI and VirtIO, all the same)
Tried linux and freeBSD iso’s, all the same.
You just saved my day!
Thank you so much for this article! I have seen many explanations and tutorials, but none were permanent. I can confirm that this works perfectly for FreeNAS 11.3 and ubuntu. Thanks!
Internet is full of shit , all this description ??? just add under maintenance the Debian and set the order to boot first from Debian than EFI
Thanks for your polite, constructive criticism. If you would like to write a guide on how it’s done I’m sure the whole of the internet would be forever in your debt.
You saved my day, thank you.
I had a black screen on some of my virtual machines (VNC) and the machines did not start anymore. This all appeared two days after I upgraded to the latest FreeNAS build.
I had to configure the VNC server to wait for an incoming VNC connection before booting the VM up. After that, I was able to get into the boot menu like described here.
Thanks for this post. I was just dealing with the manual reboot and finally looked up a solution. Luckily, your article came up rather quickly.
Thanks for the workaround!
BHYVE Boot issue with FreeNas
I love you.
Let me add some tags for other sad souls: Debian Openhabian truenas boot stuck shell.
You are a star! Thanks!
For the your ‘Just be aware though that if the grubx64.efi file ever changes…’ note. I have seen others mention that
echo “grub-efi-amd64 grub2/force_efi_extra_removable boolean true” | debconf-set-selections
might help keep the file up-to-date automatically